This type of card is very popular at the moment and I’ve made quite a few in recent months so I though I’d share with you a tutorial for how to make my latest one. This card was made to include specific things that were relevant to the recipient and so you might not want to replicate the whole design. The instructions, templates and tips for creating the card base can be used to make any style of card so you’ll probably find those parts of the tutorial the most useful. In this interpretation, I created the internal layers staggered to create a 3D scenic effect.
The instructions of this tutorial are divided into 3 sections, the first to create the card base, and the second where I will describe how I made the decorative elements I used on this card. I have named, as far as possible, the dies I used and I realise this is not a generic design but hopefully it will give you some tips on adding perspective to your scenic card and ideas for some fun, easy to make embellishments. Finally the third section at the end (added later after various requests from subscribers), describes how to make a larger, wider version of this card base using 8″x 8″ card blanks.
For this project you will need the following;
Equipment For Card Base
- Large format Score board with 0.5 cm increments (I used the Hougie Board) and scoring tool.
- Steel edged ruler
- Small ball embossing tool
- Craft knife
- Paper trimmer
- Pencil
Equipment for Embellishments as pictured
- Colour printer
- Die cutting machine
- Rubber/acrylic stamps of grasses (I used ‘Posh Impressions’ Stamp a scene a scene set).
- Various dies – I used the following; MFT Die-namics grassy hills dies, Tattered Lace Essentials Half Ovals (ETL09), Memory Box Alphabet soup Uppercase and lower case dies, Tattered Lace Lavish Blooms Set of 3 Stamen Dies, Crafts Too Dotties die, Marianne Design Creatables Die – Confetti LR0342, Spellbinders shapeablilities cherry blossoms die, Nesting circle die, Tattered Lace Tiny Tubs dies, Quickutz Revolution 4 x 4 Smilies dies, Custom made tennis shoe die, Spellbinders A2 curved matting basics dies, Xcut Speach bubbles dies, Spellbinders Sapphire alphabet one dies for ’21’, Tattered Lace sentiment dies snipped to make the word ‘Today’ and Woodware small apple punch.
Materials For Card Base
- 2 sheets of thin white card to make templates.
- 2 sheets A4 card stock in 300gsm
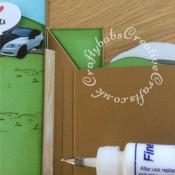
- PVA glue
Materials For Embellishments as pictured
- Distress inks – I used Hickory smoke, Black soot, Pine needles, Peeled Paint, Broken china, Faced jeans and Pumice stone.
- Variety of coloured card stock for die cuts. (or could be cut in white and coloured if preferred). If replicating this design you will need 2 full A4 sheets of the green, the other elements can be made from scraps in your stash.
- Fine liner pens and an opaque white gel pen to add details to die cuts.
SECTION ONE – Card Base
Step One – Base Outer Section Template

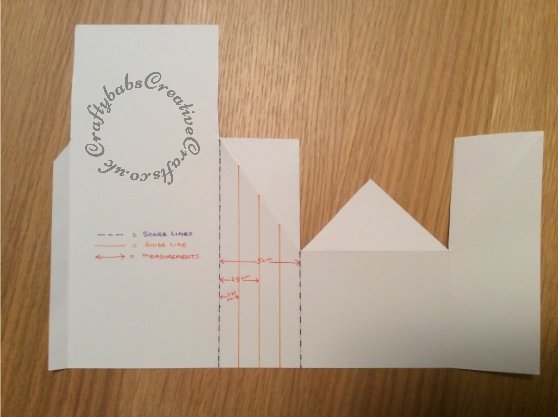
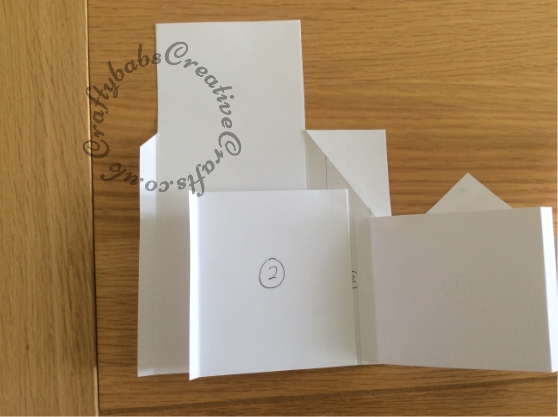
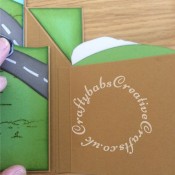
Before you begin I would strongly advise that you make a template like the one illustrated above. Careful precise measuring is the key to the success of this type of card if you want it to fold flat and open up easily. The numbers I have given on the template refer to the order in which the score lines are made.
- Trim a piece of thin A4 card down to measure 21 cm x 29 cm. This will make your scoring and measuring much easier.
- Using the picture above as a guide, place the card landscape-wise onto your scoreboard. Score at 1 cm (1), 10 cm (2), 15 cm (3) and 24 cm (4). Use a pencil to mark 7 cm up from the bottom of score lines 3 & 4.
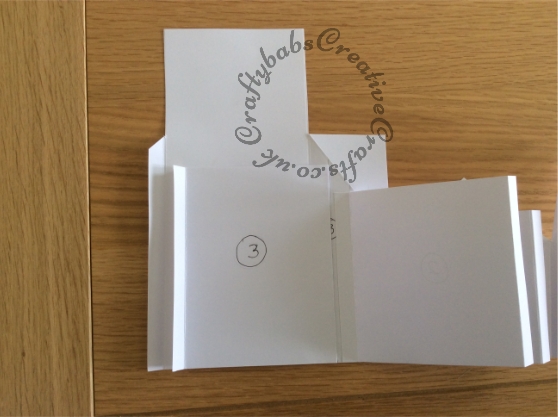
- Rotate the card clockwise to portrait orientation on your scoreboard. At the 14 cm mark score down to the first score line you made in the previous step 1 cm only. Using the same mark, miss the next section (9 cm) and then score (from score line 2) to the end. This will give you score line 5 as pictured above.
- Keeping your card in place on the board, score between the 2 pencil marks made previously on the 7 cm mark to give you score line 6.
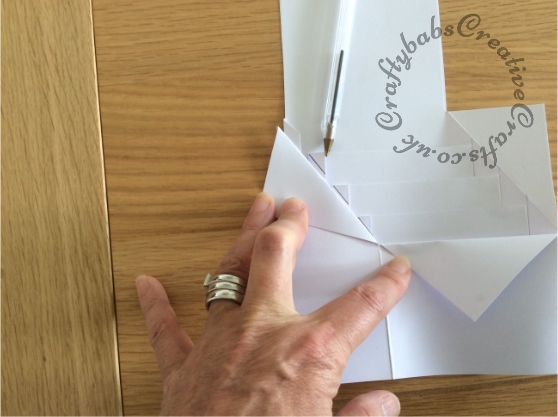
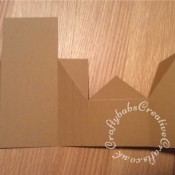
- Remove the card from your score board and cut away the areas shown as shaded in the picture above using a craft knife & steel edge ruler or paper cutter. Now score the diagonal score lines numbered 7 & 8, this is easier to do without the score board (and after removing the waste), use a small ball tool and a ruler to make the score lines.
- Fold all vertical scorelines as valley folds (inwards) then fold horizontal and diagonal scorelines as mountain folds (outwards).
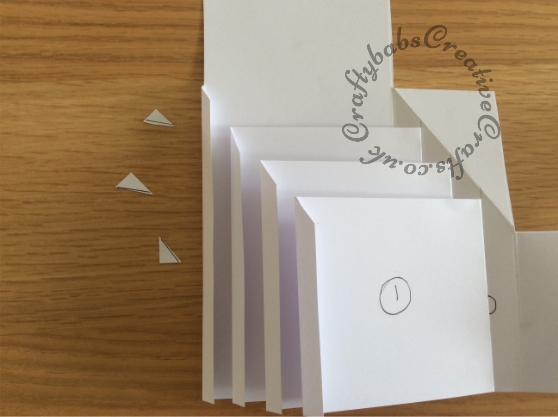
- Mark the guidelines for placement of internal sections at 1.25 cm intervals in the right hand side angled part as shown in the picture below.
Step Two – Base Inner Sections – Templates
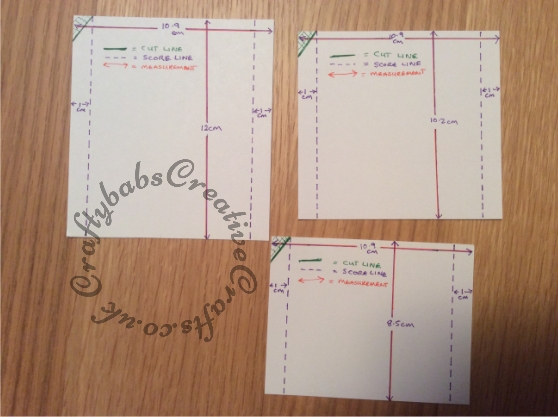
- Using thin A4 card, cut 3 rectangles in the following sizes;
- 10.9 cm wide x 8.5 cm tall
- 10.9 cm wide x 10.2 cm tall
- 10.9 cm wide x 12 cm tall
- Score 1 cm in from the edge on each side of each of all three sections.
- Fold the 1 cm border to the front on the left side and to the back on the right side of each piece.
NOTE: These inner pieces are deliberately 0.1 cm less in width than the section they will fit into on the base card. This is to allow for the thickness of 300gsm card and make sure the completed card will fold flat easily. Also, the reason for folding the edges of the inner sections forward on the left and backwards on the right also helps the card to fold flat and prevents any overlap of the internal section over the joining flap of the base itself.
Step Three – Assembly
If this is your first pop up box card, I would suggest that you use the templates you’ve just made to make a practise card from lower quality card stock before making this from your good quality card. In the pictures below, please note:- The final step I usually leave until I have finished embellishing the internal sections, however I am describing how to make the basic card base first of all so that you can choose your own way to embellish the card for any occasion. This will make more sense when you see section Two.
- Score, cut and fold all pieces as described in steps 1 & 2.
- Mark guidelines for internal sections lightly in pencil as described at the end of step one.

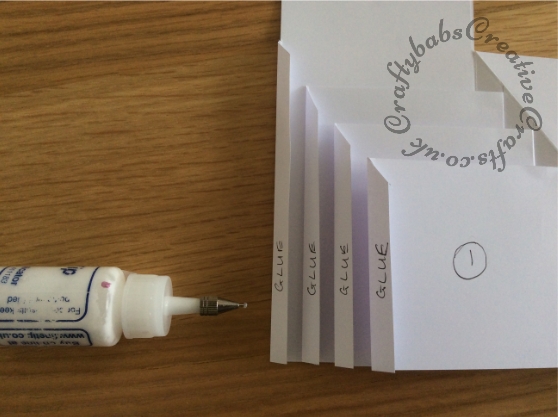
- Using PVA glue, attach the right folded back edge of the shortest internal section to the card base being careful to align the fold with the shortest guideline and keeping the bottom of the internal section level with the bottom of the card base.

- Attach the remaining 2 internal sections in the same way.
- Now fold the card in half with the upward facing edges to the left. Using a pencil, mark the line of the diagonal on all internal and outer tabs and trim off the protruding corners (see pictures below).
Final Step Of Card Base
As previously mentioned, I usually put most of the embellishments I’m using onto the card before completing this last stage as I find it easier to attach the various elements and position them for the best impact.
- To complete your card base, apply PVA glue to all 4 upward facing tabs taking care to confine the glue within the 1 cm width of the tab.
- Now, taking care to keep the bottom edges of the internal sections exactly level with the bottom edges of the outer card as you go, fold the card in half and press into place. Allow the glue to grab properly before attempting to open up the card.
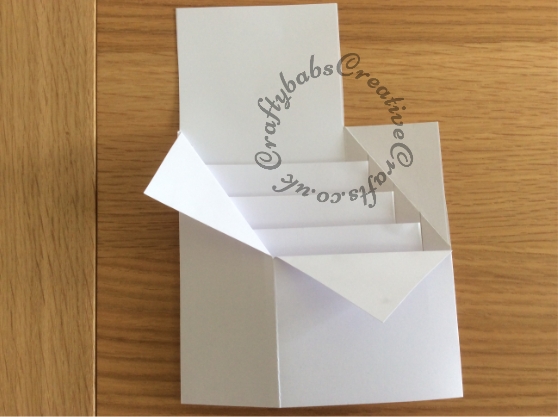
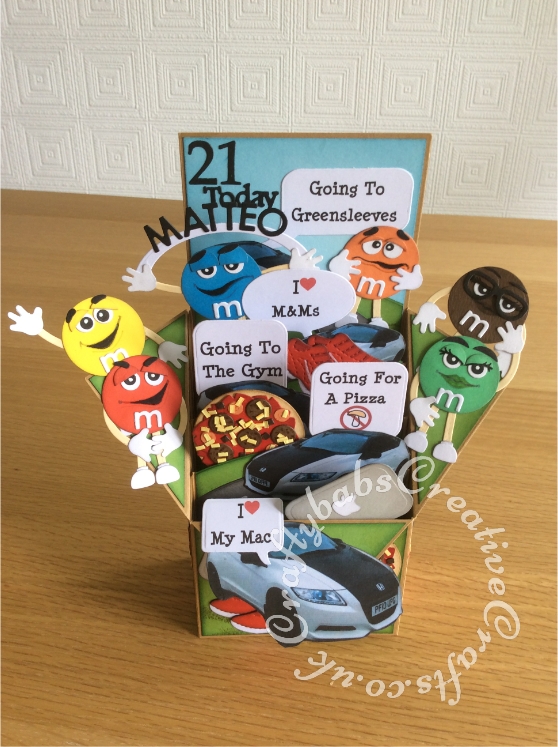
- Once the glue has done it’s job, you can then open up your assembled card and Hey Presto! there you have it. A dimensional card base that you can decorate in your chosen way.
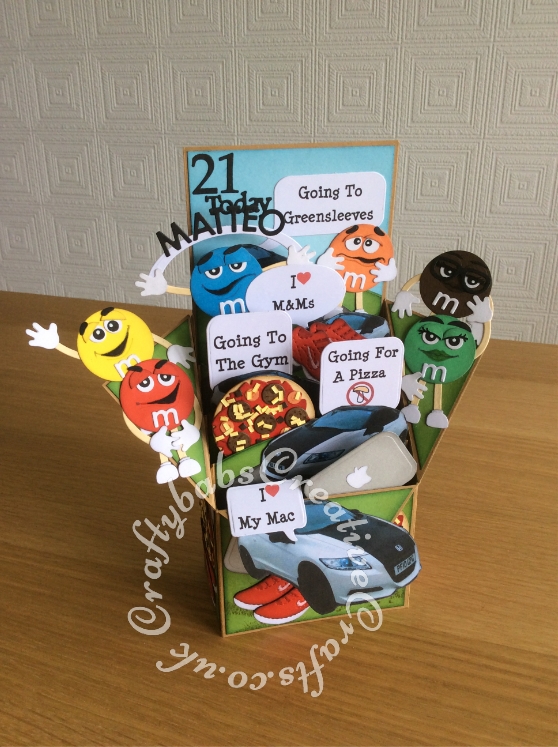
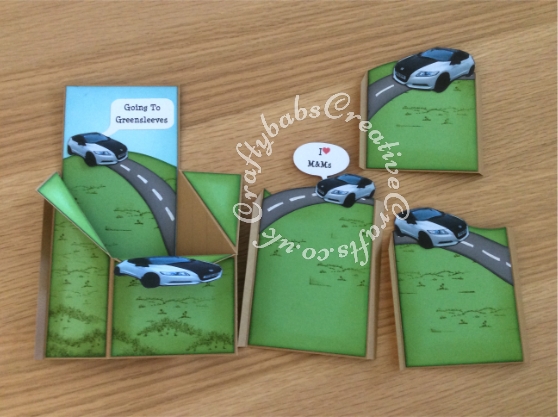
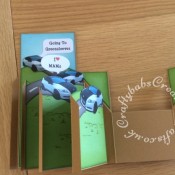
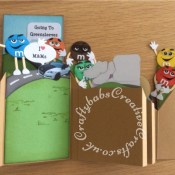
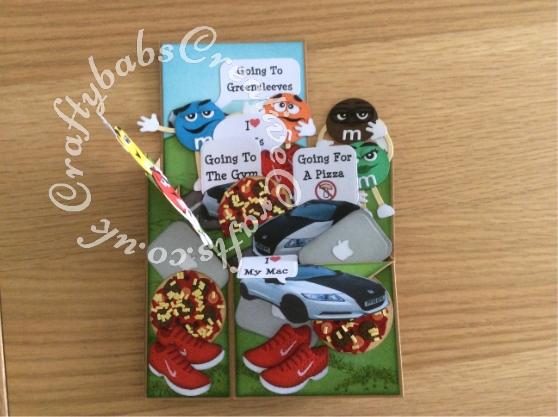
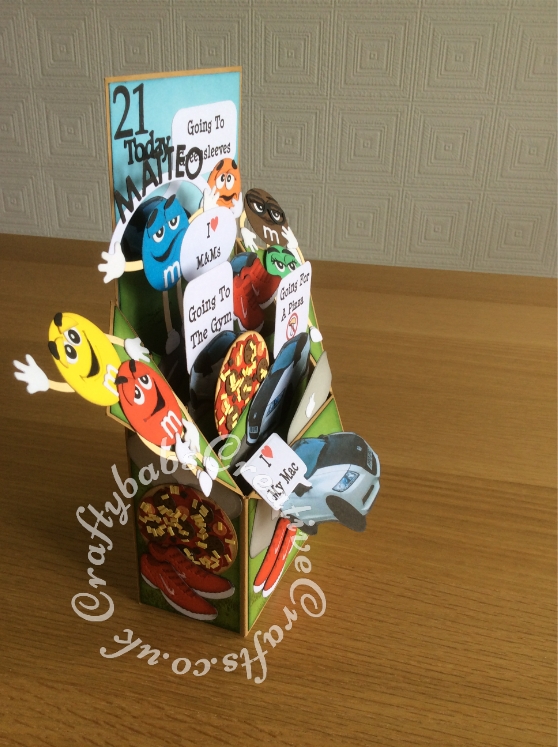
By staggering the internal sections you can add embellishments to create a 3D scene like the one in this example. To add perspective I used a photograph of the recipient’s own car and printed it in graduating sizes.

SECTION TWO – How I created this card
Card Base
I wanted to create a scenic effect incorporating pictures of the recipient’s much cherished car amongst many other things so I opted for 300gsm Kraft card for my base card. I then measured, scored and cut all of the sections as described above.

Mats & Layers
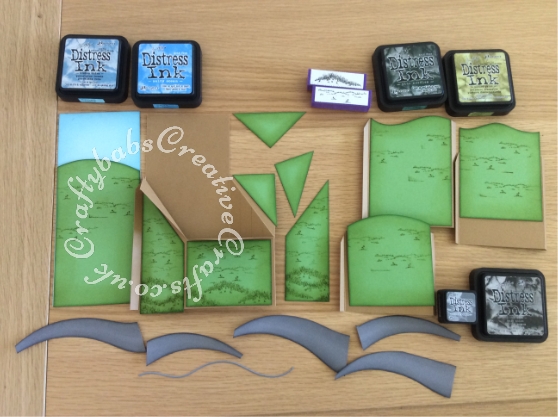
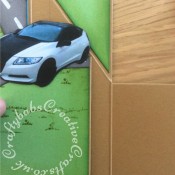
- I used pale blue and green card to mat and layer to form the sky and hills. I cut the green mats and layers for the outside of the card using the same template as for the card base but then separated the sections for each side of the card and trimmed them down to leave a 2 mm border on all sides of each piece. I stamped the outer sections with grass effect stamps (I used ‘Posh Impressions’ Stamp a scene a scene set) and Peeled Paint distress ink then inked all edges, first with Peeled Paint and then with Pine Needles distress inks.
- I cut the pale blue card to fit into the centre inside back of the card leaving a 2 mm border as before and inked it using Broken China and Faded Jeans distress inks.
- Because I wanted to create a 3D scene, I decided to curve the green mats for the internal sections to look like hills. This could be done by cutting free hand but I used MFT Die-namics grassy hills dies. The green curved sections extended slightly above the Kraft card internal sections and it took a bit of trial & error to get the effect I wanted. Once cut, these sections were stamped and inked in the same way as those on the outside of the card.
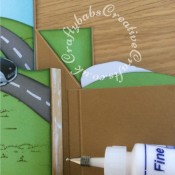
- I used the same grassy hills dies and some grey card stock to make sections of ‘road’ which I then inked with Hickory Smoke and Black Soot distress inks.
Adding Detail
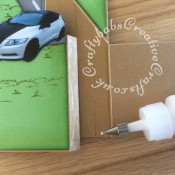
- I printed off a number if images of the car in different sizes and some mirror images which were then cut out and inked with Pumice Stone distress ink. I printed a number of appropriate sayings and die cut these using Xcut Speach bubbles dies.
- All the mats, layers and road sections were then glued to the appropriate sections of the card. I added road marking using a white gel pen.
Assembly – First stage
- I attached the internal sections to my card base as described in section 1 (to see full size images just click on thumbnails).

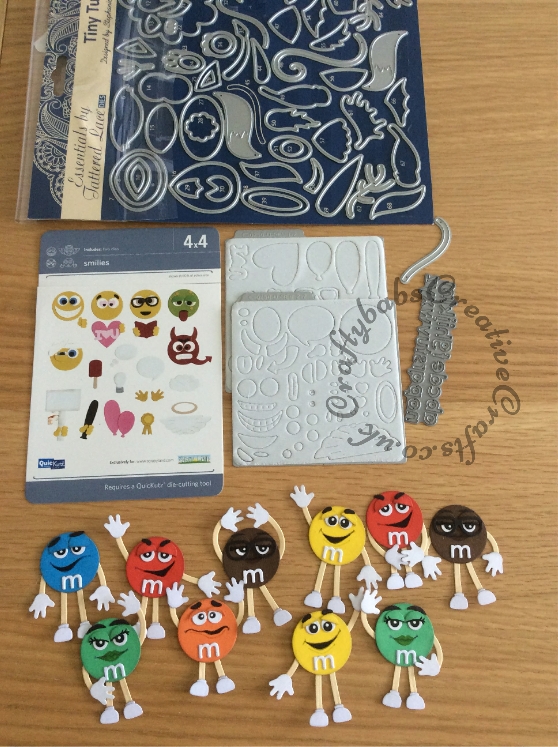
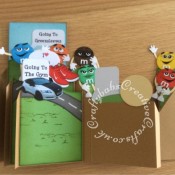
Embellishments – M & M’s
- To create these I used various dies including; Tattered Lace Tiny Tubs dies (for arms and legs), Quickutz Revolution 4 x 4 Smilies dies (for head, hands, feet and eyes) and Memory Box alphabet soup lower case letters die (for the ‘m’), but you could use any similar shaped dies to create the same effect. Die cut the various pieces from appropriately coloured card stock and assemble in different poses.
- Use fine liner pens and a white gel pen to add the facial details.
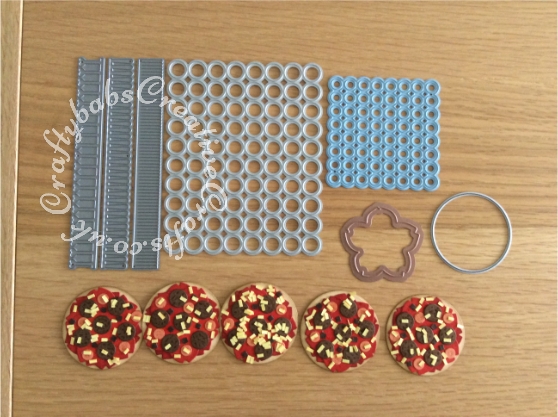
Embellishments – Pizzas
To create these I used various dies including; nesting circle die (for pizza base), Spellbinders shapeablilities cherry blossoms large flower die (cut in red x 2 for tomato sauce), Crafts Too Dotties die cut in brown (for peperami), Marianne Design Creatables Die – Confetti LR0342 cut in salmon (for salami) and Tattered Lace Lavish Blooms Stamen Die cut in lemon and snipped (for grated cheese). You could use any similar shaped dies to create the same effect. Die cut the various pieces from appropriately coloured card stock and assemble adding extra detail with fine liner pens and coordinating distress inks for shading.
- Cut the plain circles first from beige card and ink edges. Cut tomato sauce using flower die and red card x 2 die cuts, ink edges then layer on to base.
- Cut Peperami using Dotties die and brown card, ink edges and add specks with fine liner pen, glue in place.
- Cut Salami using confetti die and salmon card, ink edges and add detail with fine liner pen, glue in place.
- Cut Cheese using straight stamens die and lemon card. Snip the resulting fringe into tiny strips. dab small dots of glue onto pizza and then sprinkle ‘cheese’ on top.
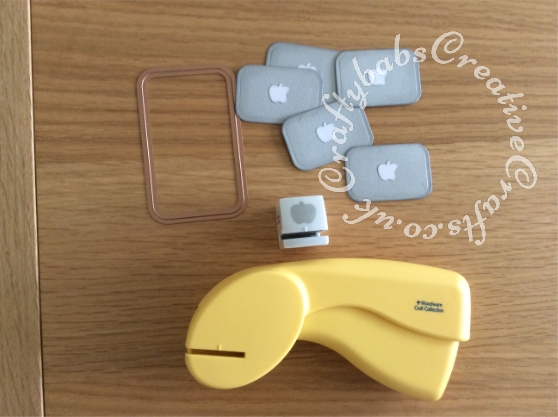
Embellishments – I Mac computers
- To create these use silver pearlescent card stock and either hand cut or use a die (I used one of the Spellbinders A2 curved matting basics dies, none of which were the right size so I moved the first die cut in the die the give me a smaller shape but retaining the curved corners). Ink edges with distress ink.
- To make the apple logo, use an appropriate die or punch or draw on using a white gel pen (I used a small woodware apple punch and then snipped to get the ‘bite’ mark) and glue in place.
Embellishments – Trainers
- I made these using a custom XL sizzlet type die bought on ebay, so you may have trouble locating one. These could easily be made by cutting out hand drawn images or even photographs. I used the die in the picture and cut each one twice, once in red, then once in white. I cut away the sole section from the red ones, inked the edges and glued in place on top of the white ones. I used fine liner pen and a white gel pen to add the detail. These were made to look like the recipient’s favourite trainers, hence the colour and design, but you could easily use any design you wish.

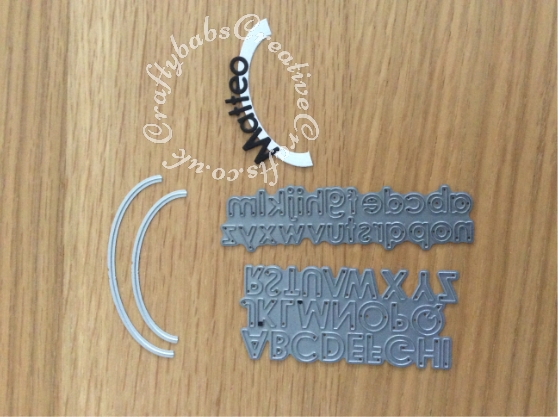
Embellishments – Name banner
- Die cut an arch shape, I used 2 dies from the Tattered Lace Essentials half Ovals set but if you don’t have these, you could use nesting ovals or circles to cut a frame and then cut that in half.
- Die cut letters required using small sized alphabet dies, I used the Memory Box Alphabet Soup dies.
- Glue the letters to the arch placing them centrally.
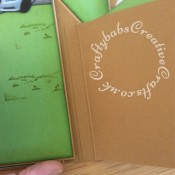
Embellishments – Sentiment
- Using your chosen sentiment dies, add sentiment inside card back. I used the Spellbinders Sapphire alphabet one dies for the number ’21’, and Tattered Lace sentiment dies snipped to make the word ‘Today’.
Assembly – Second Stage
- Arrange embellishments on internal layers and outer layers and flaps of card as desired and before gluing into place, check that the positioning does not interfere with the card popping up or being folded flat, then glue into place.
- Don’t worry if you’re not sure where to put everything as more can be added after final assembly.

Assembly – Final stage
- Apply glue to the 4 tabs as described in section One

- Now, taking care to keep the bottom edges of the internal sections exactly level with the bottom edges of the outer card as you go, fold the card in half and press and hold into place. Allow the glue to grab properly before attempting to open up the card.
- Once the glue has grabbed, you can open up your card and make any final alterations/additions. You’ll notice I added my name banner after I’d glued the final stage together.
ET VOILLA!!
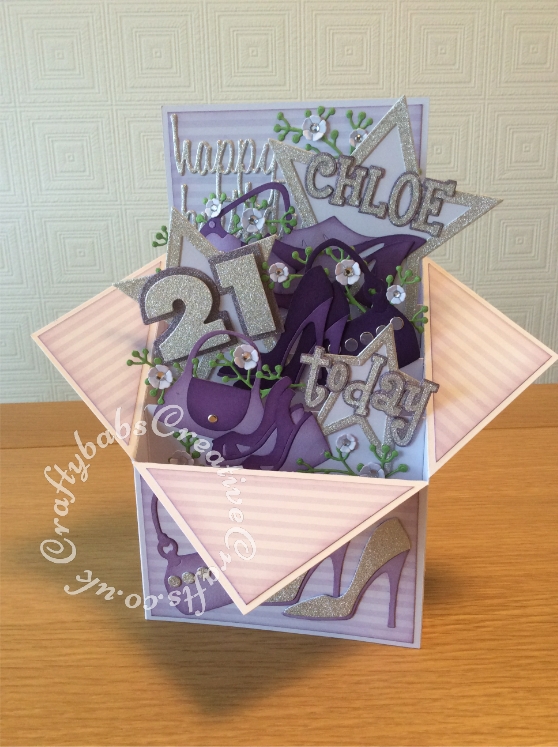
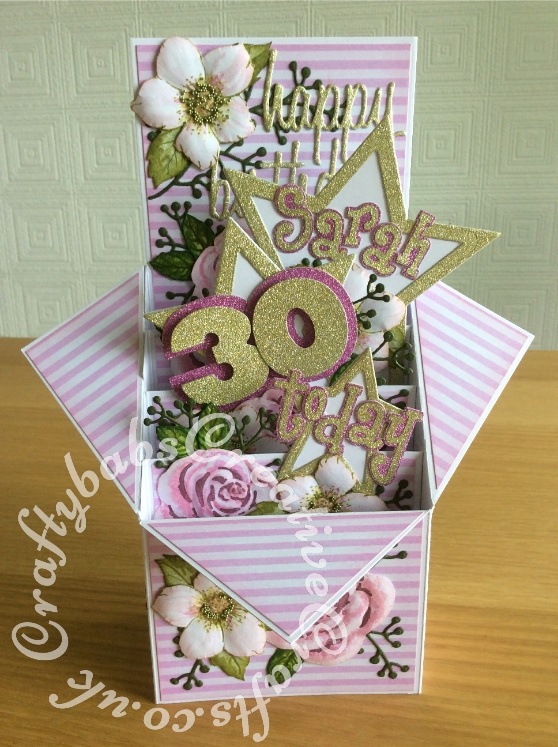
Your pop up card is now fit for a King ( or Queen ). I hope you’ve enjoyed this tutorial (why not message me and let me know what you think). I realise this design is a bit wacky but the instructions for the card base will be useful for all kinds of occasions. Scroll down to check out the pretty and feminine version below. See also below for instructions to make a larger version of the card base using an 8″x8″ (20cm square) card blank.
Using an 8″ x 8″ Card Blank for larger cards (or cut down an A3 sheet)
Equipment
- See equipment list given at the start of this tutorial
Materials
- 1 8″ x 8″ card blank plus matching card or another card blank to make the internal sections.
- If you have A3 card stock this can be cut down to measure 39cm wide by 19cm high (if using A3 you can make the card taller if you prefer but the measurements given below are for 20cm height).
- PVA glue
- Embellishments for your card.
Card Base
- Trim 1 cm from the outer edge of the card blank back so the back measures 19cm and the front measures 20cm.
- Using the templates given above as a guide (Note; the measurements will be different), place the opened card blank on your scoreboard with the untrimmed front edge on the left hand side. (the manufacturers score line should line up at 20cm).

- Score at the 1 cm line, the 13cm line and the manufacturers score line at 20cm.
- Unless you have an extra wide scoreboard, you will now need to turn the card round so that the opposite edge lines up with the left side of your scoreboard (the manufacturers score line should line up with the 19cm line). Now score at the 7cm line.
- Use a pencil to mark 7 cm up from the bottom of score lines 3 & 4.
- Rotate the card clockwise to portrait orientation on your scoreboard. At the 14 cm mark score down to the first score line you made in the previous step 1 cm only. Using the same mark, miss the next section (9 cm) and then score (from score line 2) to the end. This will give you score line 5 as pictured above.
- Keeping your card in place on the board, score between the 2 pencil marks made previously on the 7 cm mark to give you score line 6.
- Remove the card from your score board and cut away the areas shown as shaded in the picture above using a craft knife & steel edge ruler or paper cutter. Now score the diagonal score lines numbered 7 & 8, this is easier to do without the score board (and after removing the waste), use a small ball tool and a ruler to make the score lines. Note, when using an 8 x 8 card blank the tallest centre back section will extend 6cm above the top of the side flaps not 7 cm as given in the instructions for the smaller version. If you’re using A3 card instead you can make the height the same as the smaller one by cutting to 21cm height.
- Fold all vertical scorelines as valley folds (inwards) then fold horizontal and diagonal scorelines as mountain folds (outwards).
- Mark the guidelines for placement of internal sections at 1.75 cm intervals in the right hand side angled part as shown in the picture below and measure each line to give you the height you need to cut each panel.

Internal sections
- Using another card blank or matching card, cut 3 rectangles 13.9 cm wide and the height of the measurements you took in the previous step.
- Score 1 cm in from the edge on each side of each of all three sections.
- Fold the 1 cm border to the front on the left side and to the back on the right side of each piece.
NOTE: These inner pieces are deliberately 0.1 cm less in width than the section they will fit into on the base card. This is to allow for the thickness of 300gsm card and make sure the completed card will fold flat easily. Also, the reason for folding the edges of the inner sections forward on the left and backwards on the right also helps the card to fold flat and prevents any overlap of the internal section over the joining flap of the base itself.
Assembly
Please see instructions given in further back in the tutorial as the assembly for the larger version is the same as the smaller one.
Here are some examples of larger format cards made as described above;